Is this your child's symptom?
- Injuries to the arm (shoulder to hand)
- Injuries to a bone, muscle, joint or ligament
- Excluded: muscle pain caused by too much exercise or work (overuse). Covered in Arm Pain.
- Excluded: finger injury only. See that care guide.
If NOT, try one of these:
Types of Arm Injuries
- Fractures. Fractures are broken bones. A broken collarbone is the most common broken bone in children. It's easy to notice because the collar bone is tender to touch. Also, the child cannot raise the arm upward.
- Dislocations. This happens when a bone is pulled out of a joint. A dislocated elbow is the most common type of this injury in kids. It's caused by an adult quickly lifting a child by the wrist or hand. It can also be caused by suddenly pulling a child toward you. Mainly seen in 1 to 4 year olds. It's also easy to spot. The child will hold his arm as if it were in a sling. He will keep the elbow bent and the palm of the hand down.
- Sprains. Sprains are stretches and tears of ligaments.
- Strains. Strains are stretches and tears of muscles (such as a pulled muscle).
- Muscle Overuse. Muscle pain can occur without an injury. There is no fall or direct blow. Muscle overuse is from hard work or sports (such as a sore shoulder).
- Muscle bruise from a direct blow
- Bone bruise from a direct blow
- Skin Injury. Examples are a cut, scratch, scrape or bruise. All are common with arm injuries.
Pain Scale
- Mild: your child feels pain and tells you about it. But, the pain does not keep your child from any normal activities. School, play and sleep are not changed.
- Moderate: the pain keeps your child from doing some normal activities. It may wake him or her up from sleep.
- Severe: the pain is very bad. It keeps your child from doing all normal activities.
When to Call for Arm Injury
Call 911 Now
- Serious injury with many broken bones
- Major bleeding that can't be stopped
- Bone is sticking through the skin
- You think your child has a life-threatening emergency
Call Doctor or Seek Care Now
- Can't move the shoulder, elbow or wrist normally
- Collarbone is painful and can't raise arm over head
- Can't open and close the hand normally
- Skin is split open or gaping and may need stitches
- Cut over knuckle of hand
- Age less than 1 year old
- Cut or scrape and No past tetanus shots. Note: tetanus is the "T" in DTaP, TdaP, or Td vaccines.
- Severe pain and not better 2 hours after taking pain medicine
- You think your child has a serious injury
- You think your child needs to be seen, and the problem is urgent
Contact Doctor Within 24 Hours
- Very large bruise or swelling
- Pain not better after 3 days
- Dirty cut or hard to clean and no tetanus shot in more than 5 years
- Clean cut and no tetanus shot in more than 10 years
- You think your child needs to be seen, but the problem is not urgent
Contact Doctor During Office Hours
- Injury limits sports or school work
- Pain lasts more than 2 weeks
- You have other questions or concerns
Self Care at Home
- Bruised muscle or bone from direct blow
- Pain in muscle from minor pulled muscle
- Pain around joint from minor stretched ligament
- Minor cut or scrape
Care Advice for Minor Arm Injuries
- What You Should Know About Minor Arm Injuries:
- During sports, muscles and bones get bruised.
- Muscles get stretched.
- Here is some care advice that should help.
- Pain Medicine:
- To help with the pain, give an acetaminophen product (such as Tylenol).
- Another choice is an ibuprofen product (such as Advil). Ibuprofen works well for this type of pain.
- Use as needed.
- Small Cut or Scrape Treatment:
- Use direct pressure to stop any bleeding. Do this for 10 minutes or until bleeding stops.
- Wash the wound with soap and water for 5 minutes. Try to rinse the cut under running water.
- Gently scrub out any dirt with a washcloth.
- Use an antibiotic ointment (such as Polysporin). No prescription is needed. Then, cover it with a bandage. Change daily.
- Cold Pack for Pain:
- For pain or swelling, use a cold pack. You can also use ice wrapped in a wet cloth.
- Put it on the sore muscles for 20 minutes.
- Repeat 4 times on the first day, then as needed.
- Reason: Helps the pain and helps stop any bleeding.
- Caution: Avoid frostbite.
- Use Heat After 48 Hours:
- If pain lasts over 2 days, put heat on the sore muscle.
- Use a heat pack, heating pad or warm wet washcloth.
- Do this for 10 minutes, then as needed.
- Reason: Increase blood flow and improve healing.
- Caution: Avoid burns.
- Rest the Arm:
- Rest the injured arm as much as possible for 48 hours.
- What to Expect:
- Pain and swelling most often peak on day 2 or 3.
- Swelling should be gone by 7 days.
- Pain may take 2 weeks to fully go away.
- Call Your Doctor If:
- Pain becomes severe
- Pain is not better after 3 days
- Pain lasts more than 2 weeks
- You think your child needs to be seen
- Your child becomes worse
And remember, contact your doctor if your child develops any of the 'Call Your Doctor' symptoms.
Disclaimer: this health information is for educational purposes only. You, the reader, assume full responsibility for how you choose to use it.
Copyright 2000-2023. Schmitt Pediatric Guidelines LLC.
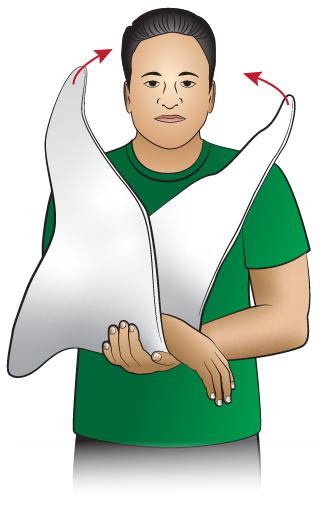
 First Aid - Sling - How to Put On
To put on a sling you first need to have a triangle-shaped bandage. Many first aid kits have a triangle bandage.
- Find the two ends of the triangle that are farthest apart. These are the ends that you will tie around the neck.
- Lay the arm down the middle of the triangle.
- Take the two ends of the triangle that are farthest apart and tie them behind the neck (a square knot is best, but any knot will do).
- Make sure the wrist is at a level higher than the heart.
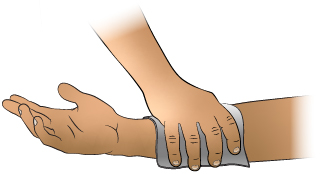
- Apply direct pressure to the entire wound with a sterile gauze dressing or a clean cloth. Once the bleeding has stopped, cover with an adhesive bandage or gauze.
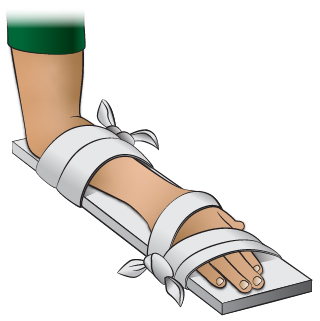
 First Aid - Splint for Wrist Injury
- Keep the hand and wrist from moving by placing them on a rigid splint (see drawing).
- Tie several cloth strips around hand/wrist to keep the splint in place. You can use a roll of gauze or tape instead of cloth strips.
Notes:
- You can make a splint from: a wooden board, magazine folded in half, folded-up newspaper, cardboard, or a pillow.
- If you have no splinting materials, then support the injured arm by resting it on a pillow or folded up blanket.
- After putting on the splint, apply a cold pack or an ice pack (wrapped in a towel) to the area.

